Having trouble using the MedicActiv platform and its simulators?
Below are some elements to help you.
Technical recommendations
Recommended hardware and configuration
Computer / tablet – Recommended configuration:
The display of on-screen virtual simulators will be optimal on a computer or tablet configured to display real-time 3D.
=> PC computer: Windows 10 and + (64 bits); i5 core processor; dedicated 3D graphics card
Our simulators cannot be installed on Chromebooks.
=> Mac computer: OSX 10.14 and +; dedicated 3D graphics card
=> iPad tablet: iPad Air 2 and + (>= iOS 11)
=> Android tablet: recent model allowing the fluid display of 3D content
=> Smartphone: nos simulateurs ne fonctionnent pas sur smartphone.
Virtual reality – Recommended configuration:
The display of virtual simulators operating in virtual reality (VR) requires a virtual reality headset.
There are different types of virtual reality headsets.
Each simulator has been configured to work on one or more types of helmets. Here are two examples of helmets:
=> HTC VIVE or HTC VIVE Pro kit
Materials required:
-
-
- HTC VIVE or HTC VIVE Pro kit (includes headset and controllers)
- “VR Ready” PC computer
- Tripods and hinges (mounting the cameras supplied in the kit)
-
=> HTC VIVE Focus Headset
Materials required:
-
-
- HTC VIVE Focus Headset (includes headphones and controllers)
-
SimforHealth and its partners can help you purchase or rent the necessary equipment for your training.
Starting a simulator (online or installation)
There are 2 options to start a simulator on MedicActiV:
- Simulator launched in the web browser
- Simulator downloaded and installed on the computer or tablet
Launching a simulator in the browser:
The simulators are developed with 3D technologies having a complete accounting with “WebGL”.
Simulators can only be started with the following browsers:
- Chrome
- Firefox
- Safari
- Microsoft Edge
Important : Internet Explorer is not supported by MedicActiV because it does not support WebGL
Simulator installation:
1) Installation on PC Windows
The installation of the simulator requires that you have the right to install programs on the computer.
Once the simulator download is complete, click on the.exe file and follow the installation steps. We recommend that you create a shortcut on your desktop to easily find access to the simulator.
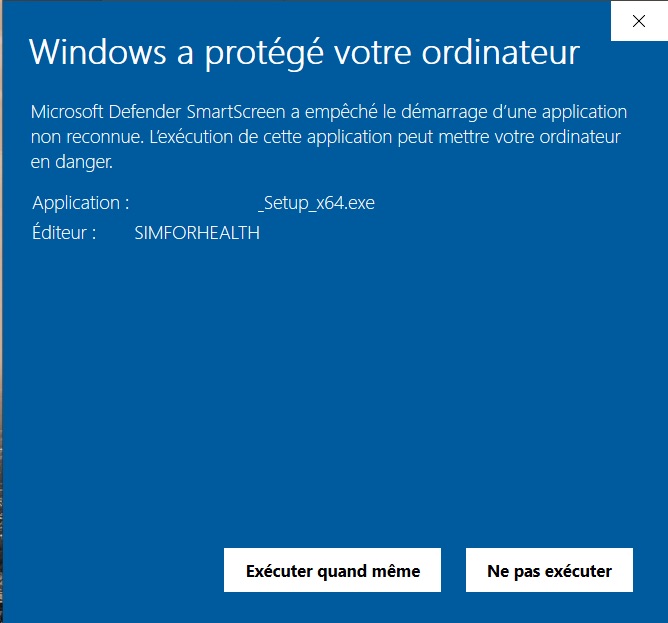
When installing the application, Windows may display an alert panel stating that Windows has “protected your computer”.
If you are in this case, click on the “Additional Information” link to display the installation button.
Remark: For any larger deployment on workstations you can use GPO install procedures.
The installer is compatible with GPO scripts.
2) Installation on MacOSX
The installation of the simulator requires that you have the right to install applications on the computer.
Once the simulator download is complete, launch the program installer and follow the installation steps.
Once the installation is complete you will find the simulator in your applications.
According to your security settings, you may need to manually open the application.
In this case, from the Finder on your Mac, locate the app/installer you want to open, then press Control and click on the app icon.
You have to choose Open from the shortcut menu, then Click on the Open action.
Note:
If you have an Apple machine not using Intel processors (e.g: “M1”), you may have to use the “Rosetta” system extension in order to be able to run the simulators.
More information on the following link: https://support.apple.com/fr-fr/HT211861
3) iOS tablet installation
After clicking on the application installation button, return to the Desktop to see the application install.
IMPORTANT: To launch this application downloaded directly from our website, you must first authorize it in the Settings.
Go to Settings / General / Device management
Select ” Radiant “ then ” trust Radiant “
You can then launch the MedicActiV application.
More information from: Apple Support
4) Installation on Android tablet
After starting the loading of the application, you will find the application in the download list of your web browser.
The application is downloaded directly from our website.
Click on the application Medicactiv_viewer.apk then on “Install”.
IMPORTANT : If you have not authorized the use of applications downloaded from a website on your tablet,
go to Settings / Security / Unknown source: “allow the installation of applications from unknown sources “ and tick this box.
Android Updates: When the application is updated, you will be offered a new download. You will then have to follow the same procedure as for its installation.
Difficulties in displaying a simulator
The display of images is very slow or jerky:
Your graphics card may not be specifically adapted to display 3D content (see paragraph “Hardware and recommended configuration“).
To consult the simulators, if you are on PC or Mac you can, however:
- download and install the simulator instead of launching it online
- the launch of a simulator
- reduce the simulator display resolution (by pressing the “Shift” key while clicking on the application at launch)
- check the “windowed” box (to avoid full screen)
- select a display lower than “fantastic” (beautiful, good, simple)
- update your graphics drivers
The loading of the simulator is very long:
It is possible that your internet connection is not powerful enough (see paragraph “Network, firewall and emails“).
We recommend that you install the simulator on your computer or tablet rather than launching it in the browser (online display). Once installed, the simulator will require less bandwidth to operate.
Network, firewalls and domain names
Your Internet network:
An internet connection is always necessary to consult the simulators.
MedicActiV offers two options to start a simulator.
- Simulator launched in the web browser: a very high speed/fiber connection is recommended.
- Simulator downloaded and installed on the computer or tablet: a high-speed connection is recommended.
If your connection is powerful, we recommend that you install the simulator on the computer or tablet.
If you experience problems when launching the application, it is possible that a firewall or security software may block the program’s access to the Internet network. To fix this, simply allow the application or change your network filtering rules on your firewall (see paragraph “Settings for your firewall“).
Settings for your firewall:
=> The IP addresses to be authorized in your institution are as follows:
| Environment | IP | Port | Protocol |
| Loadbalancer | 35.190.64.64.245 | 80 & 443 | HTTP / HTTPS |
| Medicactiv platform | 34.77.65.65.4 | 80 & 443 | HTTP / HTTPS / ICMP |
The areas to be whitelisted in your institution are as follows:
=>
| Domains (http+https) |
| *.medicactiv.com |
| storage.googleapis.com |
| api.vidal.fr |
Settings for emails:
MedicActiV is required to send emails to users. An email is sent to finalize the account creation step and the choice of the user’s password.
Domain names (emails) to be “whitelisted” in your institution: @medicactiv.com
TCU and General Data Protection Regulation (GDPR)
You will find our General Terms of Use (GTU) at the following link: https://app.medicactiv.com/cgu
You can find our Privacy and Personal Data Protection Policy at the following link: https://www.medicactiv.com/fr/confidentialite/
Start on MedicActiV
Login to MedicActiV
The MedicActiV platform is available at the following address: app.medicactiv.com
You have already created a MedicActiV account:
Use your login details to log in. This is your email address and password.
Login to MedicActiV for the first time:
=> You wish to access the MedicActiV space of a structure (training establishment, care establishments, etc.):
You must receive an invitation email from your institution. This invitation email is sent automatically when the administrators or trainers in the space add you.
If you have not received this email, check your spam or contact the structure to make sure it has added you to your space.
=> You want to create a personal account to discover MedicActiV
You must create an account for free. To do this, click on the “Create a MedicActiV account” button and complete the form. You will then receive an email allowing you to choose your password. If you do not receive this email, please check your spam.
Spaces on MedicActiV
3Each institution, structure or organization can benefit from its own space on MedicActiV. Each user has a personal space.
A user can have access to different spaces.
Example of Pr Plantier, a cardiologist at the University Hospital of Paris, involved in the French Society of Cardiology and professor at the Faculty of Medicine of Paris.
Thanks to MedicActiV, Mr. Plantier has access to 4 spaces:
– his personal space which allows him to access the demonstration simulators and the authoring tool for personal use ;
– the space of the University Hospital of Paris which allows him to access the simulators designed by the University Hospital Training Department service
– the space of the Faculty of Medicine in Paris that allows him to have access to the simulators he designed thanks to the MedicActiV authoring tool to train his students ;
– the FSC space where he can consult the simulators that the FSC has designed with SimforHealth

A user can access the different spaces with which he is associated with only one identifier (email and password). It can pass from one space to another thanks to the banner of spaces on MedicActiV. The headband can be opened and formed with the button ![]() . To connect to one of the spaces it is necessary to click on the “Access this space” button.
. To connect to one of the spaces it is necessary to click on the “Access this space” button.
Users and roles
Users can access the different functionalities of the platform according to the role they have been assigned.
There are 4 roles on the platform: Administrator; Trainer; Author; Learner
A user can combine several roles (e.g. trainer and author; administrator and trainer; etc.). When you combine several roles, they are displayed on the home page. You must then click on one of the roles to access the functionalities related to it.
When a user has only one role, he is directly connected to the screen of the functionalities of his role.
What is a training session?
A training session allows one or more simulators to be distributed to a group of learners over a period of time.
Example: I create a training session to distribute simulator #601 and simulator #602 to the “Promo 2nd year” group of learners from 01/01/2019 to 05/03/2019.
Training sessions are created by the trainers and accessible by the learners (if they are part of the session’s group of learners).
The “Training sessions” feature allows you to view current, upcoming or past training sessions. It also provides access to the results of each session.
How to create and manage training sessions?
Access to training sessions:
– For a learner: from the functionality My training sessions, he can access the training sessions that have been created by his trainers.
– For a trainer: from the functionality My training sessions; he can create, modify or delete his training sessions. The trainer who has created a training session is the only trainer who can visualize the results of his learners.
– For an administrator: from the functionality Training sessions he can view all training sessions created by the trainers and access the learners’ results.
Creating a training session:
A training session is created by a user in the role of trainer or administrator.
Go to the training sessions (see above) and click on the button Create a training session at the top right.
The creation of a training session is done in 5 steps:
- Step 1: Give your session a name and indicate the duration of this session
- Step 2: Select a group of learners
- Step 3: Define session settings
- Step 4: Selection of simulators
- Step 5: Confirmation
It is necessary to form groups of learners before creating a training session.
Modify a training session:
A training session can be modified while it is in progress (to extend its duration, shorten its duration, etc.). To do this, access the training sessions and click on the edit button (column Edit). Warning, the results associated with a session can have an impact on the results associated with it.
◊
You haven’t found the answer to your problem? Contact us: help@simforhealth.com
We will answer you as soon as possible.